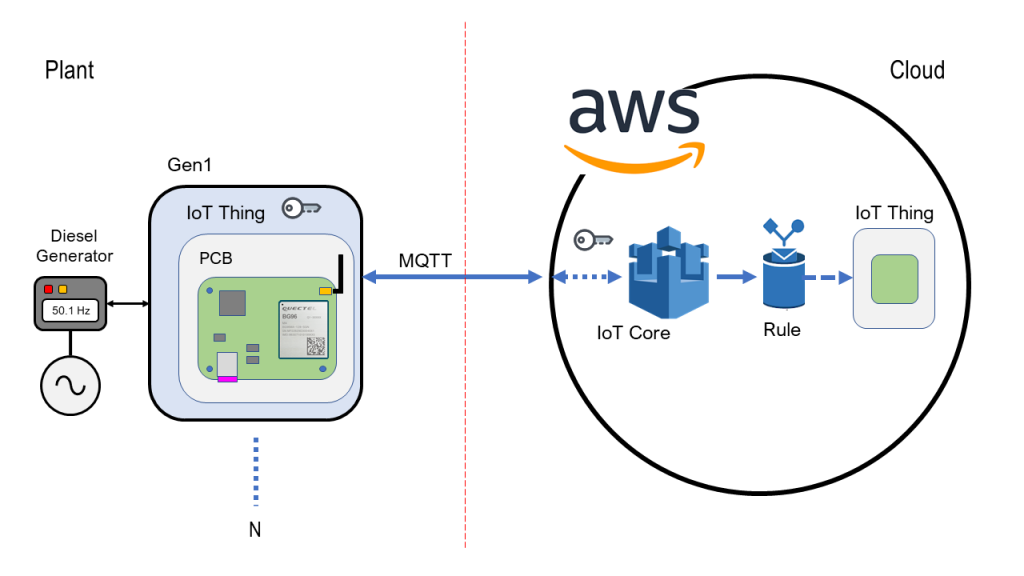
1.0 Overview
This step by step guide will walk you through all the necessary steps required to be taken to successfully connect to Amazon Web Services with MQTT and a BG96.
2.0 Requirements
To overcome any misalignment due to hardware and software differences the following listings provide the hardware and firmware version used. Please use at least the same firmware revision when following this guide.
2.1 Hardware

2.2 Firmware
B96 Firmware Version: BG96MAR03A04M1GA
2.3 Amazon Web Services
You are free to use our test servers or register for free at: https://aws.amazon.com/. If you are using our test server then you can skip the next step.
3.0 Setup of Amazon Web Services
It’s important to setup the AWS IoT Core certificates, policies and rules correctly to establish a secure connection to your thing. Please follow the guide on how to setup AWS: aws-certificates-policies-rules
Please make sure that the certificate created on AWS is attached to your thing and to the policy. The settings on AWS regarding the policy shall be set to (when you add new policy it has versions; make sure it uses the latest one or delete the previous ones):
{
  "Version": "2012-10-17",
  "Statement": [
    {
      "Effect": "Allow",
      "Action": "*",
      "Resource": "*"
    }
  ]
}
Important
Please continue on to the next topic once you have followed the above guide and the certificates, policies and rules have been setup.
4.0 Load the certificates on the BG96
We can now load the certificates generated by AWS on to the file system using QCOM. We are going to load the following files:
- private key – *.private.key
- certificate – *.cert.pem
- AWS IoT server signed certificate – AmazonRootCA1.crt
* is a wildcard

It’s required to upload the certificates to UFS (user file system). You may use QCOM and the AT FILE commands to do so.
- Open QCOM and connect to the BG96.
- Click on Select File at the bottom of the program and it will load and prompts the file size in bytes.
- Send the AT+QFUPL=”AmazonRootCA1.crt”,1188
- When CONNECT is received then press Send File

Example Log
ATI

Quectel
BG96
Revision: BG96MAR03A04M1GA

OK
AT+QFLST="*"

+QFLST: "mcfg_sw.mbn",26812
+QFLST: "security/",2

OK
AT+QFUPL="AmazonRootCA1.crt",1188

CONNECT
+QFUPL: 1188,2d13
We are all set. Close the program and lets continue to the next step.
MQTT Client on BG96
We shall assume that after following the amazon guide you have created a thing named: BG96
SSL Connection
Open QCOM or any other terminal program and lets setup the MQTT client to use a secure connection.
AT+QSSLCFG="cacert",2,"AmazonRootCA1.crt"
OK
AT+QSSLCFG="clientcert",2,"bacefb2a6f-certificate.pem"
OK
AT+QSSLCFG="clientkey",2,"bacefb2a6f-private.pem"
OK
AT+QSSLCFG="ciphersuite",2,0XFFFF
OK
AT+QSSLCFG="sslversion",2,4
OK
AT+QSSLCFG="seclevel",2,2
OK
AT+QSSLCFG="ignorelocaltime",1
+QSSLCFG:"ignorelocaltime",1,1

OK

AT+QMTCFG="ssl",0,1,2
Set the MQTT Version
AWS uses MQTT version 3.1.1 so we need to set our client to use version 3.1.1 with the following command:
AT+QMTCFG="version",0,4
OK
Open a Connection
Our AWS URL is a3nv2orw0qbxmx-ats.iot.us-east-2.amazonaws.com. Please change this with your URL if not using our server.
AT+QMTOPEN=0,"a3nv2orw0qbxmx-ats.iot.us-east-2.amazonaws.com",8883
OK

+QMTOPEN: 0,0
Connect to thing BG96
AT+QMTCONN=0,"BG96"
OK

+QMTCONN: 0,0,0
Publish to a Subject
For the shake of simplicity we publish to the shadow of BG96.
AT+QMTPUB=0,0,0,0,"$aws/things/quectel-iot-bg96/shadow/update"
>
Once the > character is prompted you can type in the message and terminate it with CTRL+Z or 0x1A form the console.
Conclusion
When connecting to AWS the setup process is tricky and the policies, rules and certificates need to be setup correctly in order to successfully connect to your thing.
If you aren’t able to connect to your this then please re-check the policies, rules and certificates on the modules and AWS.